
Recently I’ve got a really fine machine to play around with – and after some weeks now, I defenitely love it.
A Tuxedo InfinityBook S 15 Gen6
To put it short, this thing is fast, looks very plain, seems to be pretty solid, has one of the best keyboards I’ve ever used, the battery lasts more than 8 hours (no games or other demanding stuff) and the display with its slim bezel looks very classy by the way.
Concerning the speakers – maybe you heard that they are worse. That’s not true. They are way more worse. I don’t know, what the folks at Tuxedo were smoking when they decided to put that piece of crap into an otherwise fine device. Anyway, I don’t really care about that …
For me the second shortcoming was that pre-installed Ubuntu coming along with Flatpak and Snapstore and a Budgie-Desktop. I ordered the Infinity pre-installed just to give it a try, but you can get it without installed OS, too. In hindsight, this would have been the better option.
But this is how to install Linux Mint with Cinnamon on your Tuxedo. It is mainly for those having eg. Ubuntu already installed, but actually the steps for a complete new installation should be the same. Anyway, I assume you know what you are doing now:
Back up your stuff, because the existing partitions will be (at least) formatted. Since years I’m using Grsync for this task.
This is my current partition scheme:
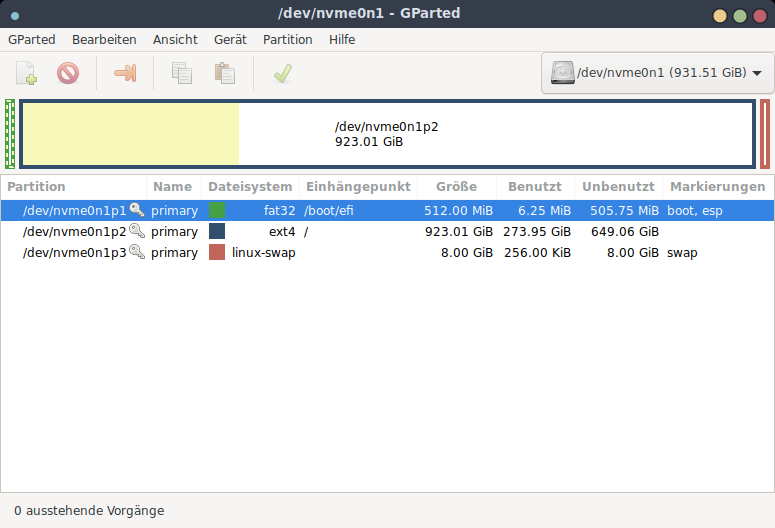
I didn’t change it and just formatted /dev/nvme0n1p2 later on during the installation of Mint.
So grab the last edition of Linux Mint and make sure to download the EDGE Version of Cinnamon or Mate. Otherwise things will not work. Here is an inxi -F after installing Mint just to show the technical details of my patient:

Okay, after downloading the ISO burn it to an USB-Stick. Apropos, while setting up a RaspBerry-Pi a while ago, I came across their Imager. Since then it’s my favourite tool for burning.
Once you have your backup checked, restart your machine. You can reach the boot-menu by pressing „F2“ while booting. Start the normal installation, hit „Something else“ when you’re asked for the installation type. Since my machine is linux-only I just touched the second partition (see first picture) by choosing „/“ as mount-point again and formatting it as „ext4“ afterwards.
After installation and reboot there are 2 things left. We need to get the „Fn“-keys back to work and install „Tuxedo Control Center“ to control the profiles. Well, I don’t know if you really need to install TCC to manage profiles but I was to lazy to find out how it could work with Mint-Tools only.
This is where we go now to download and install the keybord driver and TCC. First we need the latest version of tuxedo-keyboard/ and tuxedo-control-center/
Install the keyboard driver before TCC, otherwise TCC will complain about missing dependencies. That’s it. Keyboard and TCC is working as on the original Ubuntu installation.
Keep your fingers away from Tomte. It does not support Linux Mint yet.